The Middle District of Alabama has received calls from several citizens this week reporting calls from bad actors posing as law enforcement. Common elements of the calls appear to be the use of a real name of a US Marshal official... Read more
Evidence Presentation Guide
The courtroom audio visual system is managed by the Judge and/or Courtroom Deputy (CRD). Multiple input sources are available to facilitate evidence presentation. The following features outline the capabilities of the courtroom’s evidence presentation system. Attorneys are strongly encouraged to coordinate with the respective judge’s CRD at least three (3) weeks prior to trial to schedule a courtroom technology test session.
- Regular courtroom technology testing is available every Wednesday at 8:30 A.M. in
Courtroom 2F. If this day and time is not convenient, please contact the respective judge’s
CRD to schedule testing.
Download a PDF version of this information.
Laptop Connections
For optimal resolution, laptop display settings should be 1080p, though all resolutions up to 1080p are supported.
Connection Points:
- Plaintiff/Government table and the primary Defense table feature HDMI and USBC connections. Connections are located within hideaway panels on each table’s surface.
- AC power outlets are available on the floor in front of each counsel table.
Important Notes:
- Attorneys using Apple devices must provide their own HDMI adapters.
- The Court does not provide adapters of power cords.
- Instructions for accessing the Court’s Public Access Wi-Fi are available at counsel tables
Presentation Lectern:
The presentation lectern serves as the primary workstation for attorneys, offering access to various input sources, including:
- Document Camera
- Laptop Inputs (HDMI)
Attorneys may also annotate or highlight exhibits displayed on courtroom monitors from this station.
Important Note:
- The CRD controls all audiovisual inputs within the courtroom. Attorneys must request the CRD to switch inputs sources (e.g., document camera, plaintiff's table, or defense table).
Document Camera:
The document camera projects physical evidence onto courtroom monitors, ensuring visibility for counsel, witnesses, jurors, and the Court.
Supported Materials:
- Documents (up to 9" x 12")
- Photographs
- 3D Projects
- Transparency sheets and slides
Controls:
Use the scroll wheel on top of the device for zoom and focus adjustments.
Touchscreen Monitor:
The courtroom features two interactive touchscreens:
- One at the witness stand
- One at the lectern
These touch-enabled displays allow users to annotate exhibits by drawing directly on the screen with their finger.
Annotation Features:
- Mark-up displayed content
- Change Annotation colors
- Undo the last mark or clear all marks
- Highlight specific areas of interest
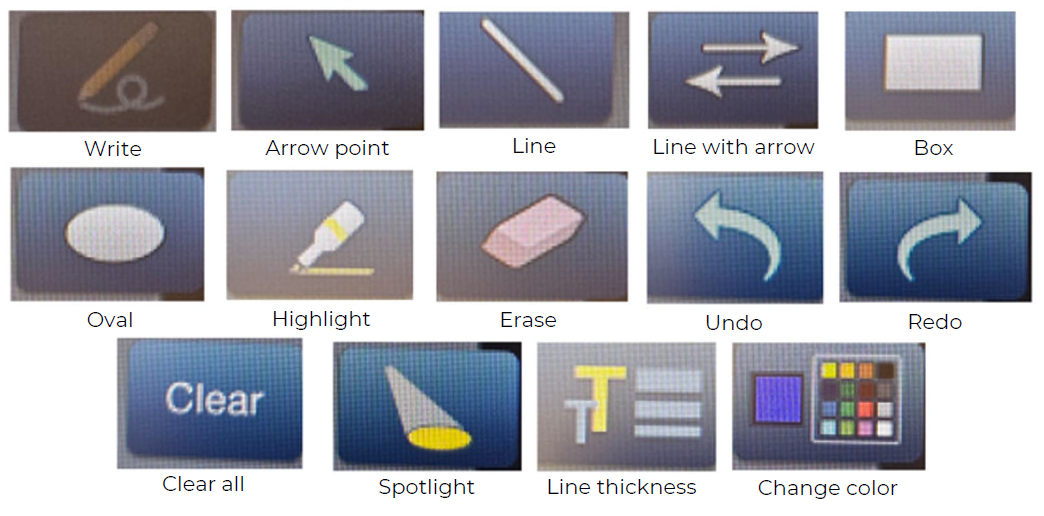
Annotation Guide:
- Reference the guide located below the monitor for available menu options
- Apply firm pressure when using the touchscreen
Assistive Hearing Equipment:
Hearing assistance devices are available in the courtroom
- Advance notice is requested for accommodations
- Please inform the CRD if hearing devices will be needed and specify the number of users requiring them.
Instructions:
- Ensure the logo is facing away from the user's body.
- Use channel "A" (2.3MHz) for amplified courtroom audio.
Microphone Etiquette:
- Speak clearly and directly into the microphone
- Do not point the microphone straight up
- Avoid placing cell phones near microphones. Wireless devices can cause electromagnetic interference that disrupts proceedings.
- To ensure privacy, press and hold the mute button (green light off = muted)
- Microphones are highly sensitive and will pick up even subtle sounds
Devices That Can Cause Interference:
- Cellular Telephones
- Bluetooth Devices
- Any Wi-Fi enabled device
Making Use of Technology
The technology is available for any proceeding in which the technology would benefit the presentation of evidence. If you would like to make use of this technology, you will need to make arrangements a minimum of 5 working days in advance of any court proceedings. To assist you in this, contact the Court Room Deputy or our Information Technology (IT) Staff. Click here to download the technology request form.